Add Yourself to a Waitlist
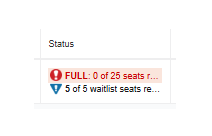
If a course section is full, you may be able to add yourself to a waitlist. To see if a course has open waitlist seats, pay attention to the "Status" column of your search results in Browse Classes.
To add yourself to a waitlist:
- Start at the Student Hub
- Select “Self Service”
- Select “Registration”
- Select “Register for Classes”
- Select the correct term
- Use the search fields in the “Find Classes” tab to locate the course, and select "Add"
- In the bottom right "Summary" box, you will see a column called "Action" with a drop-down menu. Click on the drop-down menu and select "Waitlist."
- Select "Submit."
To confirm you have been added to the waitlist, you will see “waitlist” in green by the course.
Items to note:
You will receive an email if a seat opens up in the course you are waitlisted for.
You have 24 hours to register for the course in Banner Self Service > Registration. Select the "Action" drop-down menu, select "Register," then "Submit."
It is recommended that you have a backup section or another backup course in mind in case you are unable to move from the waitlist into the course.